How to install Boei on Google Tag Manager
You can install Boei effortlessly on your Google Tag Manager site, and you won't even need a developer.
Just grab a cup of coffee ☕️, and you can do the installation in 5-mins yourself.
Step 1. Create an account
Create a Boei account if you don't have one yet. The onboarding trains your AI chatbot on your website content. You can also add other ways customers can reach you, like WhatsApp, email, or phone.
Step 2. Copy installation code
In your Boei dashboard, open your widget and click the Install tab. Select Google Tag Manager and copy the installation code.
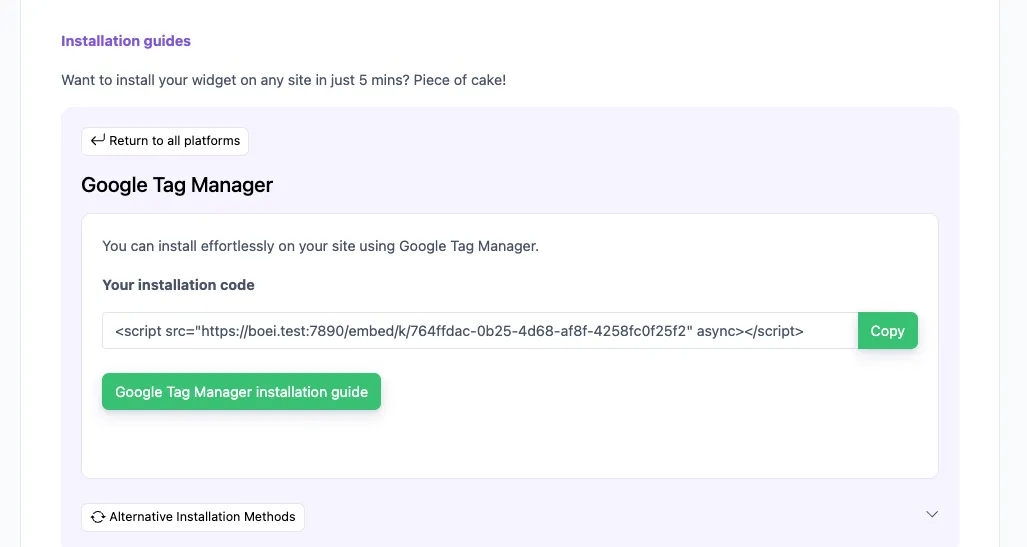
Tip: The Install tab also offers a landing page link, QR code, and iframe embed.
Step 3. Go to Google Tag Manager
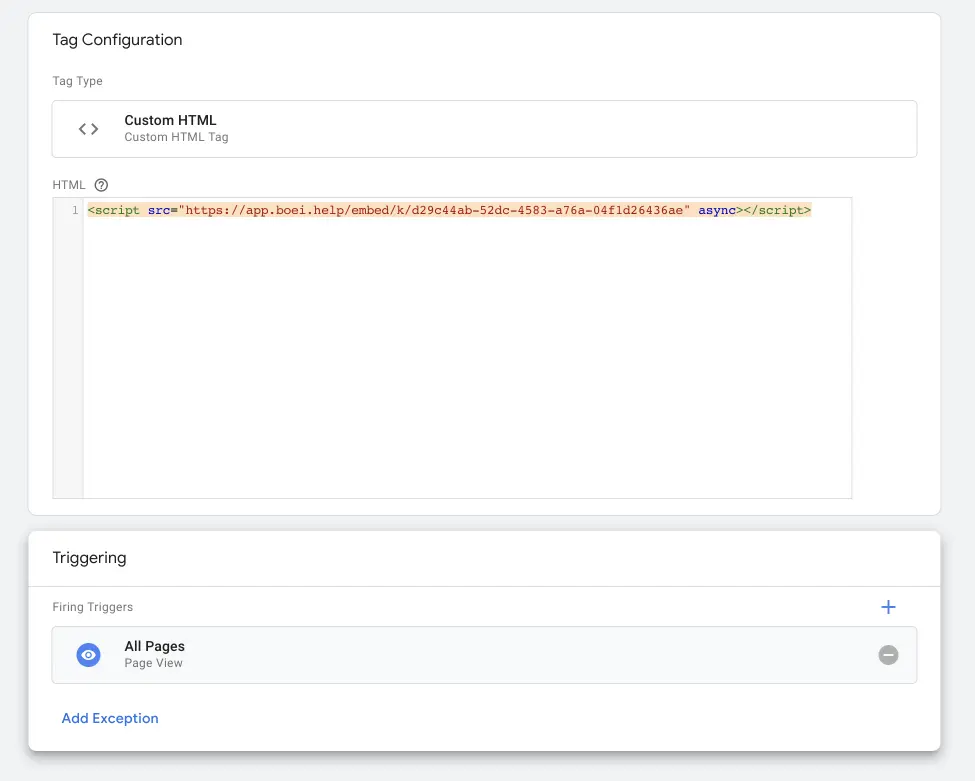
- Login to GTM and click New Tag.
- Choose Custom HTML tag.
- Paste the Boei code from step 2 in the HTML area.
- Choose a trigger (e.g. All Pages).
Step 4. Save and publish
Click Save, then Submit to publish your changes.

Congrats, you are done!
Troubleshooting
If the Boei chatbot doesn't appear on your site:
- Hard-refresh the page (Cmd+Shift+R on Mac, Ctrl+Shift+R on Windows) to bypass browser cache.
- Disable ad blockers in your test browser. Some block third-party scripts.
- Make sure you clicked Submit in GTM (Save alone doesn't publish the tag) and that your trigger fires on All Pages.
Common questions
Will it slow down my site? No, Boei loads asynchronously after your page renders.
Does it work on mobile? Yes, the chatbot is fully responsive.
Can I show it only on certain pages? Yes, set page rules in your Boei dashboard, or use GTM trigger conditions.
- Install on AdPage
- Install on Adobe Muse
- Install on BigCommerce
- Install on Blogger
- Install on carrd
- Install on Divi
- Install on Drupal
- Install on Ecwid
- Install on Elementor
- Install on Framer
- Install on Ghost
- Install on Google Tag Manager
- Install on HTML
- Install on Hostinger
- Install on Jimdo
- Install on Joomla
- Install on JouwWeb
- Install on Kajabi
- Install on Lightspeed
- Install on Magento
- Install on OpenCart
- Install on Phoenix
- Install on Prestashop
- Install on Shopify
- Install on Squarespace
- Install on Strato
- Install on Tilda
- Install on Umbraco
- Install on Webflow
- Install on Webnode
- Install on Weebly
- Install on Wix
- Install on WordPress
- Other